
KITCHEN LAYOUT & CABINET CONSIDERATIONS
When Mark and I started the kitchen remodel, we weren’t sure what we wanted to do with the cabinets. Our first thought was to paint the ones we had, which would have been $1200 to have someone come in and do it. It was something I considered doing, but I was also 6 months pregnant when we started this and working on painting the 2nd bedroom upstairs to create a toddler bedroom for Faith. I did this so we could reuse her nursery furniture and redecorate the room for Dean. I’d like to do some future posts on their bedrooms. Anyway, I digress. Below is the kitchen layout again, which I featured in my first post of the series.


As chance would have it, Mark found through a friend another local cabinetmaker who supplies cabinets as well as granite countertops. Mark was able to go and check out his products, which were the same style and had the same construction features as the Wolf cabinets. For us to get our cabinets, granite, a few custom cabinet inserts, our sink and installation done we spent $4500.


Kitchen Elements:
Things that we upgraded for that were totally worth it.
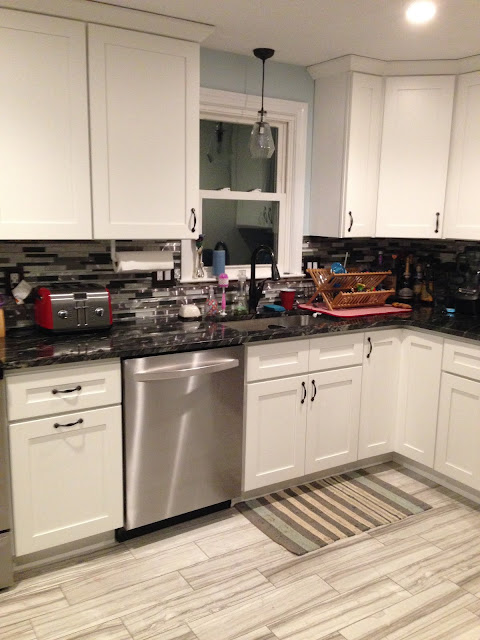
After the cabinets were installed, my husband put up the backsplash. When I had pulled together kitchen designs on Pinterest that I liked (board here, follow me here (user mbcandacejean)), one element that I was drawn to where subway tiles for backsplash. Once we were at Home Depot and I showed them to Mark, he was not a huge fan so we both agreed upon the one we’re currently sporting, though I was a bit nervous it was going to be too busy. Now, if you are handy, I think you can probably handle backsplash. Since ours was a complicated interlocking design, Mark required a wet saw in order to match the pieces together. So if you’re handy like me and you can use at most a power drill and paint brush, you might want to hire someone. A close up of the backsplash and granite.

This concludes part 2 of my Kitchen Remodel Series – I hope it’s helpful! Next, I’ll discuss our wall removal. I may even join that in with paint selection since wall removal, building a soffit and pipe reducting is not the most exciting thing.
Love, Candace Jean
This post has been shared at these link ups.
BUDGET & NEEDS
After Mark pulled out the cabinets to do the floors, he realized what poor condition they were in and we scrapped the idea of repainting them. The first thing we did was set our budget at $3000 for the cabinets. In general, we were aiming to keep remodel expenses low as we have plans later on to do an addition, which would be off our current kitchen. The idea was to modernized the look and put in quality material that could last for 5-10 years, but may not be the kitchen we stick with if we stay in this house. For budget considerations – 1) painted or not 2) cabinet material 3) closing mechanism 4) panel style. Then I started pulling together kitchen designs that I liked.MY KITCHEN INSPIRATION
 |
| Images source Pinterest - 1, 2, 3, 4 |
CABINET SHOPPING
We started at Home Depot since we purchased our floor and backsplash through them. After looking around, we spoke with a sales person and discovered that the middle of the line cabinets, which would be in our price range would take two months to come in. Home Depot has cabinets in stock, BUT, they are typically made from plywood, not hardwood or MDF (medium-density fiberboard) and don’t have the slow-close feature (this is a specific type of hinge which prevents the door panel from slamming back in place – it’s really, really nice!). Mind you, this conversation was based around knowing the total room area of our kitchen and its shape. Next, we went to a small kitchen design shop in our town. We talk to a sales person, again describing our kitchen and giving our price range. She introduced us to Wolf cabinetry. These cabinets are made in Pennsylvania from hardwood material and the company has ready stock of standard cabinet sizes in white shaker (style and color cabinets we wanted). After we left, I emailed the woman, provided detailed measurements and pictures of our kitchen. When I didn’t hear back from her, I went onto Wolf Cabinets website and found other local dealers. Below is a rendering of what our kitchen would look like with Wolf York cabinets in white. Nice, right!? What wasn’t nice was the sticker shock. She told us that this was going to cost $4500. At this point, 3 weeks had passed and Mark and I started regretting our decision not to go with Home Depot.As chance would have it, Mark found through a friend another local cabinetmaker who supplies cabinets as well as granite countertops. Mark was able to go and check out his products, which were the same style and had the same construction features as the Wolf cabinets. For us to get our cabinets, granite, a few custom cabinet inserts, our sink and installation done we spent $4500.
MY KITCHEN OVERVIEW


- MSI International Cityscape interlocking tile
- Silverwaves granite
- Dowell undermount stainless steel single bowl sink (28” W x 16” D)
- Home Depot antique bronze cabinet handles (extra $)
- Kohler single-hole sink faucet with pull-down spout (extra $)
IMPORTANT THINGS WE LEARNED
- When considering kitchen layout and design, there should be about 18 inches between the countertops and the bottom of your upper cabinets
- Whatever you have for an upper cabinet, you want a same size matching bottom cabinet for symmetry
- When picking a bottom cabinet that’s below a window, you want the cabinet to be at minimum, the width of the window with trim
- Even if you haven’t picked out new appliances, you can still work up a kitchen design. Most appliances come in stock sizes – your dishwasher - 24”, your stove - 30", your fridge - 36"
- Know what your sink faucet will be for cutting and placing in the granite
FEATURES ABOUT THE NEW KITCHEN
- Selected 36” upper cabinets – this reduced the space between the cabinets and ceiling, which was covered with crown moulding and provided greater distance between the shelves
- Trash/recycle bin insert – we lost storage space by selecting one of our base cabinets to be used for trash, but it was totally worth it!! It eliminates the need for a trashcan in the room and provides a handy spot to put my recycles so I’m not constantly going outside
- Silverware insert – rather than buying one at the store (I had purchased one previously at IKEA that didn’t even fit!), the insert is in the drawer of my bottom cabinet next to the fridge directly under my dishes and it’s amazing and keeps everything way more organized
BACKSPLASH

This concludes part 2 of my Kitchen Remodel Series – I hope it’s helpful! Next, I’ll discuss our wall removal. I may even join that in with paint selection since wall removal, building a soffit and pipe reducting is not the most exciting thing.
Love, Candace Jean
This post has been shared at these link ups.


Your blog post on kitchen cabinets is insightful and informative! Choosing the right cabinets is crucial for functionality and aesthetics in any kitchen remodel. I appreciate how you detailed the various options and considerations, making it easier to understand the impact of each choice. For those considering a kitchen remodel in Chennai, understanding these nuances is essential. Integrating modular kitchen Chennai can further enhance both the style and efficiency of the space, catering perfectly to modern living needs. Your expertise shines through, offering valuable guidance to anyone embarking on a kitchen renovation journey.
ReplyDelete